regiy provider billing
Introduction
This document helps you to understand the billing options offered by the regify provider software.
There are three types of business model in the regify provider software:
-
fair flat fee with date termination for regimail professional
-
pay per transaction for regimail (mass sender), regipay and regibill
-
optional pay per usage for regibox
For the regimail professional fair flat fee, the customer pays to get a fair flat for a given period of time. For example, he buys 12 months of regimail professional membership. In this time, he is limited to 500 transactions a month. If you, as a provider, like to increase this limit, you can change this to be 1000 in the user administration for each user individually. If the regimail professional period ends, the user is informed by e-mail a few days before (default is 7 and 3 days). If he does not re-length by buying, he will fall back to regimail private membership automatically.
The business model for regimail mass senders, regipay and regibill is to pay per transaction. If you activate regimail mass sender, regipay or regibill usage for a customer (user administration), he is able to send an unlimited number of regimail, regibill or regipay messages. In order to give you an invoicing opportunity, the regify provider uses some sort of internal bank account for these customers.
If the user is using regibox, he most likely will pay a fixed rate to get a fixed maximum size for his regiboxes. If the regify provider decides to bill depending on the size, the regify provider system offers export of individual user regibox sizes.
Ordering of regimail
The regify provider software offers an internal shop system for the users to allow a simple ordering process for their regimail professional membership. This system is customizable and allows different ways of integration and automation.
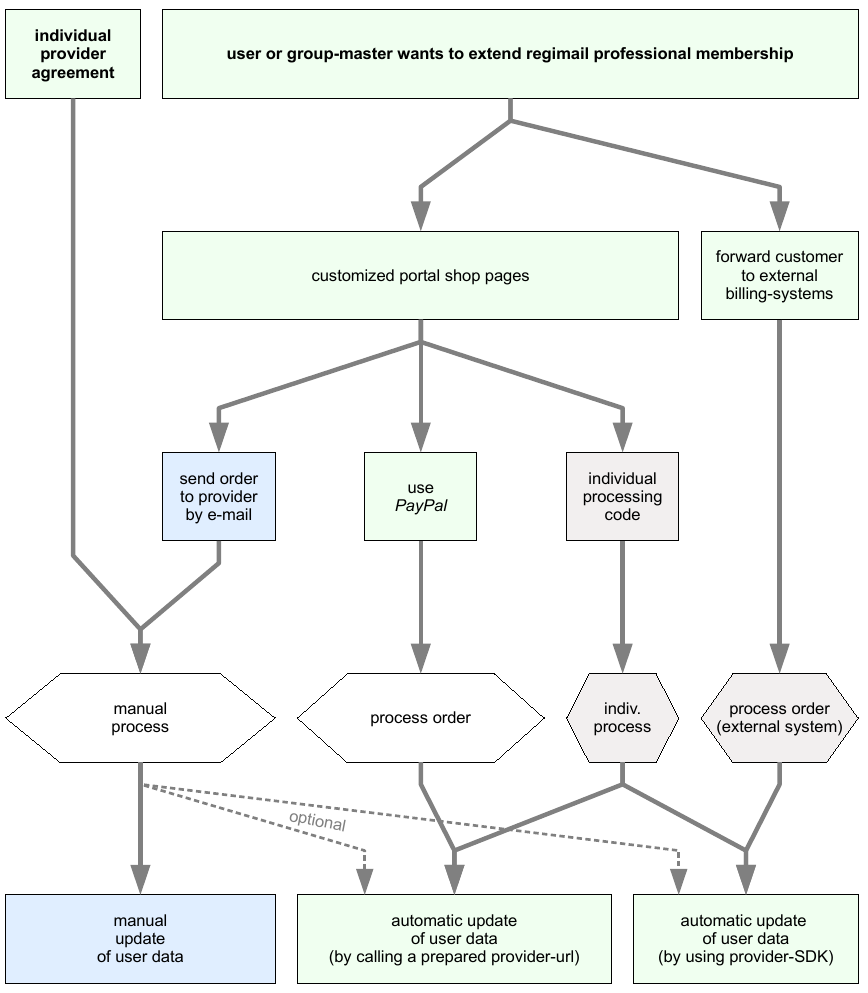
The following chart shows the available options:
-
Individual regify provider agreement. This option allows the regify provider to manually complete the whole process. The user and the provider simply agree on a deal. The regify provider receives the arranged reward and sets the regimail professional membership manually to the new value. The shop-system of the regify provider is not involved in any way.
-
A regify user or group-administrator likes to buy or re-length the regimail professional membership.
-
The provider uses the integrated customizable shop-system. There are different options to customize the internal shop. For example, the information needed from the customer or the mandatory fields and the product options and prices can get adopted to individual needs. Upon placing the order, the information can get handled in different ways:
-
Manual orders - sending order to regify provider by e-mail. By default, the regify provider receives an e-mail with the ordering information. The regify provider may manually send an invoice or some payment information to the customer. Upon successfully payment, an employee of the regify provider needs to confirm this payment in the regify provider administration dialogue (a single button-click to confirm the payment).
-
Use PayPal e-commerce system. You can use a PayPal account to allow customer payments using PayPal and Credit Card. After successful payment, the regimail professional membership of the customer is automatically re-length. The invoicing needs to be processed manually like using manual shop-system. Every order generates you an e-mail with billing information. Please have a look at the addendum in this document to get configuration information for PayPal.
-
Do some individual processing. The regify-provider allows you to insert individual php code to your shop-system (described later in this document). You can process the customers order by yourself with anything you may need. For example, you can create e-mails, forward the data to external systems (like your own billing system). Your solution may use the Provider-SDK to re-length the regimail professional membership or to update any other user-data.
-
-
The regify provider forwards the user directly to an external shop-system. This option allows the regify provider to set direct links to external shop-pages. The links can use individual placeholders (in UTF8 encoding) to submit additional information in the URL. This can be the User ID, Name, Address and other information.
-
The corresponding placeholder tokens in the customizable URL are:
-
-
[uid] = User ID
[un]  = Username (usually email address)
[fn]  = First Name
[ln]  = Last Name
[ti]  = Title
[fu]  = Full Name
[c]   = Organization
[m]   = Email address (main)
[a1]  = Address1
[a2]  = Address2
[ct]  = City
[zip] = ZIP Code
[pid] = Sub-Provider ID
[lg]  = Language Code
[gid] = Group ID
[gc]  = Group Code
[gn]  = Group Name
Example URL:
https://shop.provider.com/customShop.php?UID=[uid]&fullName=[fu]&mail=[m]
After successfully processing the order, the external system can use the regify Provider-SDK functionality to extend regimail professional membership of the user or the group.
Manual processing
If manual processing was chose, if an order was placed using the shop system, the orders can get managed using the web administration option Manage orders. The dialogue offers three views:
Open orders, Finished orders and Cancelled orders
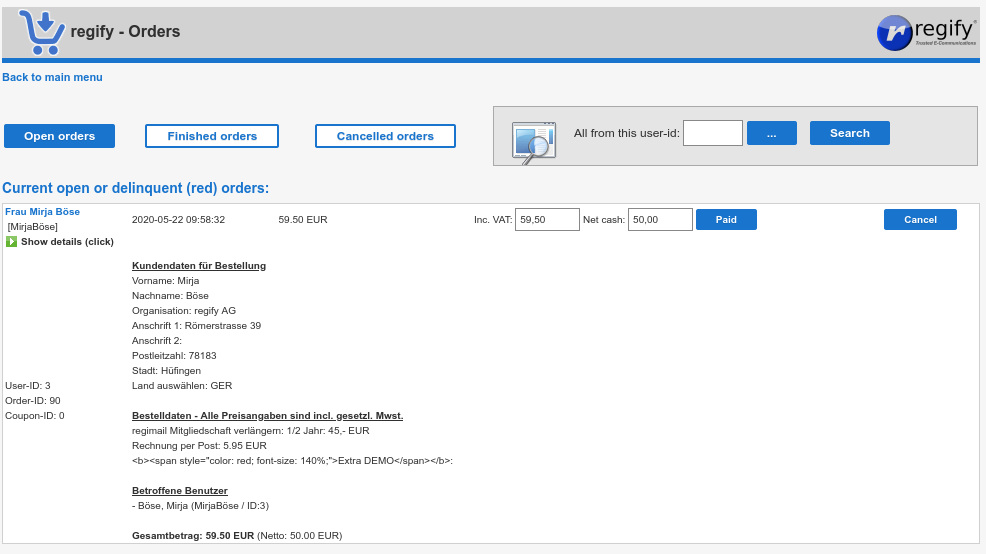
Click the buttons to open the respective views. After clicking Open orders, you can see all open orders that are not yet processed.
Click the Show details link to open and close the details of each entry. In there you can see all relevant information to manually write an invoice.
If the customer has paid the invoice, you can update the status of the user(s) simply by clicking the Paid button behind the price. This will update the regify accounts of all affected regify accounts and mark the order as “finished”.
After clicking Finished orders you can see all successful orders of the past and using Cancelled orders, you get a list of all manually or automated cancelled orders.
Please use the Search function to get all activity regarding a specific user (all three states in one view).
Manual billing notes
In the default setting, orders stay here for 21 days. If not processed until then, they will get cancelled automatically (ORDER_INVALID_AFTER).
You can automate the click onto Paid button by using PayPal.
Billing of regimail mass, regipay and regibill
Every customer gets his own internal bank account. As soon as you activate regimail mass sending, regibill or regipay for a user, the user gets a menu option.
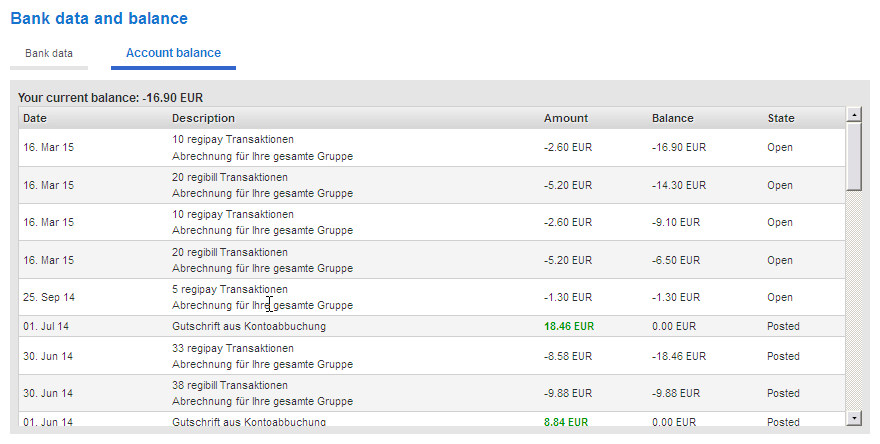
Bank data and account dialogue
This dialogue allows him to enter bank data and to take a look at his internal account. Upon this, you can make use of automatic debit.
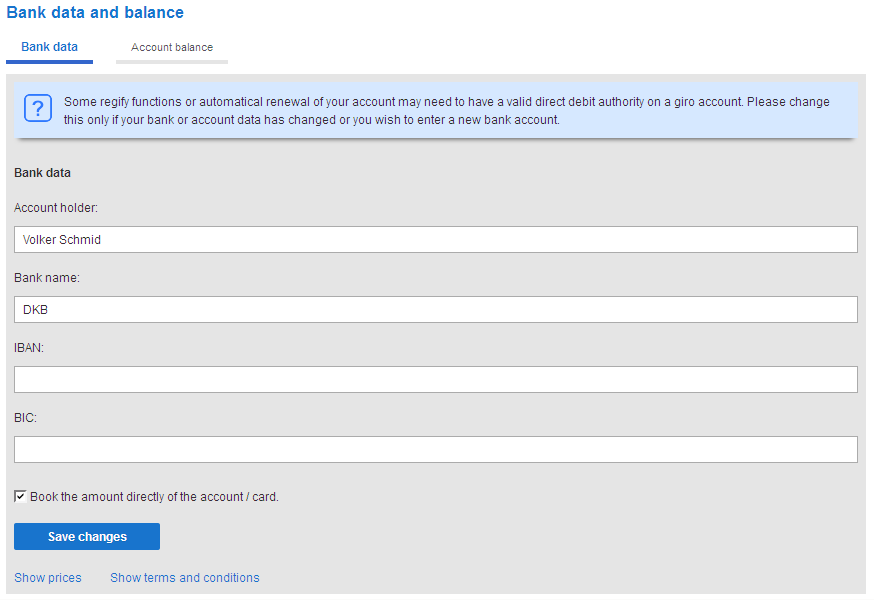
If you like to allow people sending regibill/regipay only if the checkbox “Book amount directly of the account” is checked, you can set the DEBITSTATECHECK in your provider configuration to TRUE. In this case, customers who did not check this flag are not allowed to register any regibill or regipay transaction. By default, this is set to FALSE and allows people to use regibill and regipay without this flag set.
Automatic debit calculation
Your regify provider does an automatic job in intervals to calculate the money that people owe you. This interval depends on the INVOICINGINTERVAL setting in your provider configuration. You can choose between a daily, weekly, monthly (default) or quarterly calculation of the bank accounts. We recommend you to do this weekly or monthly.
As soon as this happens, the system multiplies the current number of regibill, regipay and regimail mass transactions with the prices you set in your provider configuration. This result is added as a new negative account entry in the customers internal bank account.
 The image above shows the sub-provider management with price fields.
| The values are including VAT! |
This procedure leads to internal accounts having negative entries and balance if something is sent.
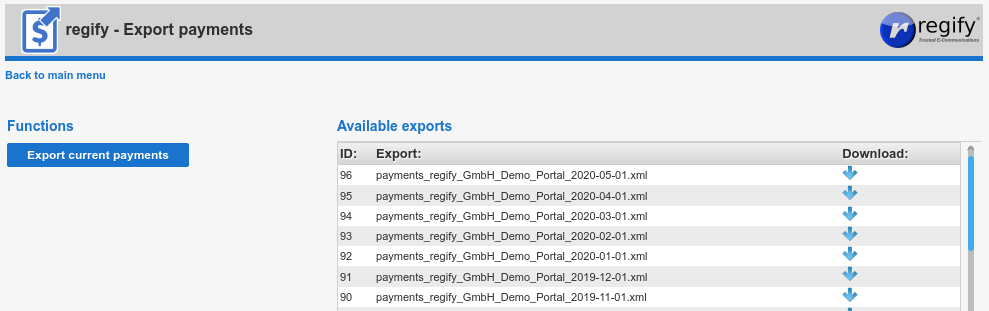
Export payments
You can export the negative and positive payments directly from your regify provider administration (“Export payments”). Exporting the negative balanced entries does two jobs:
-
It generates positive bank account entries to bring the balance to zero. For example, if the current balance of a user is -1000, exporting will generate a positive entry of +1000 to the users account.
-
It generates an XML file that contains the values of the generated positive bank account entries of job 1. These XML files can get downloaded. They contain all needed information to allow you automatic debit.
All the exports are stored in the database and can get downloaded multiple times in your regify provider administration.
| Entries are not exported if the user did not allow automatic debit for his bank account! |
Automatic export
The regify provider software offers the internal function
DoPaymentsExport($ProviderID, $ProviderName)to be used in your individual reports.php customization file. This allows you to automatically call the export by entering some date and time checks and a line like this (if you are interested, please contact support@regify.com):
$Entries = DoPaymentsExport(1, “myProviderName”);Edit payments and bank account data
The regify provider offers detailed editing of the users bank account entries.
Every single entry can get one of the three states: open, booked or cancelled.
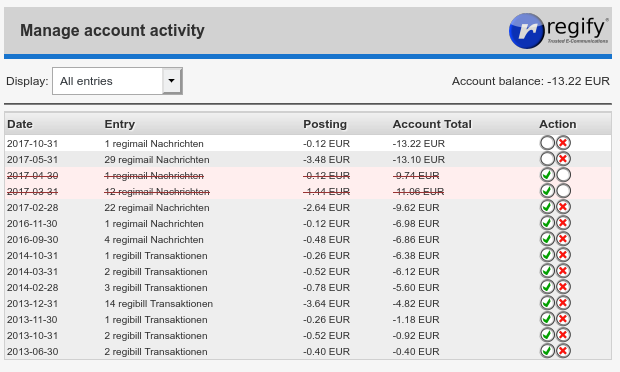
If you cancel payments, the account will get recalculated on the next export (for example, if some debit failed).
Process overview
The following steps are leading you to some valid payment XML download:
-
Customers generating regibill/regipay transaction(s). They are all counted in the user database.
-
In INVOICINGINTERVAL intervals, these counters are used to calculate prices and create internal bank account entries. Counters are reset after this.
-
Now you can call the export function manually or automatically. This generates some new XML export and positive entries into the users internal bank accounts (user balance is set to 0).
-
Now the XML export can get downloaded.
Overall activity export
You can also export an activity report completely independent of the internal shop system of the regify provider. The “Data export” function is available on your provider administration interface.
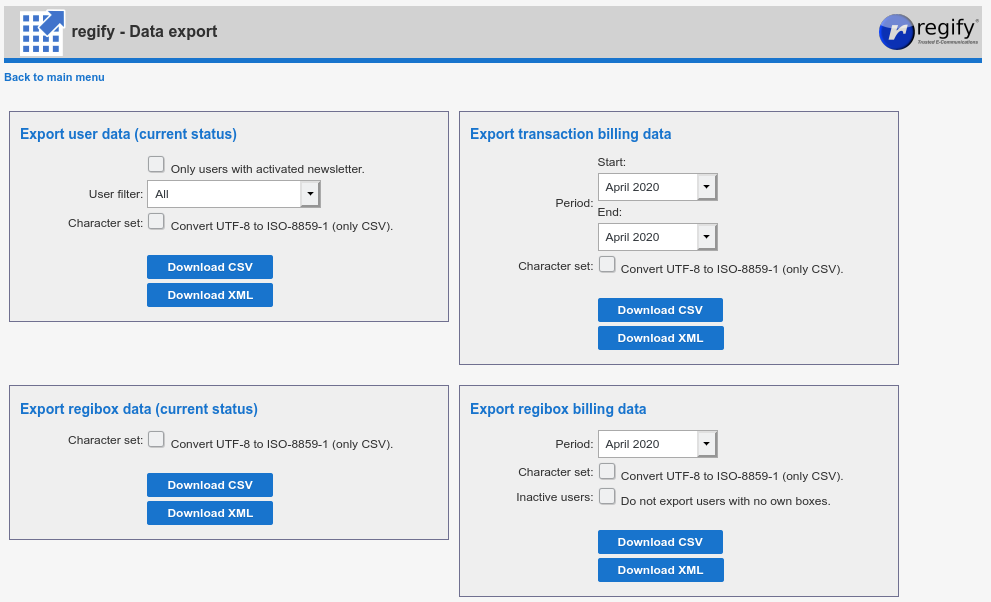
If you export activity data from here, the customers internal bank account is not affected and no billing entries are created. This data may get used to create your own billing for mass senders and users independent of any other mechanisms.
In order to load the CSV files to current Microsoft Excel versions, please check the option to convert to ISO-8859-1 character set as Excel is not able to correctly import utf8 encoded files. OpenOffice and LibreOffice seem to import the utf8 encoded files with no problems.
If you like to use this data for billing, please deactivate customers bank data pages (remove flag P from sub-provider menu flags) and set INVOICINGINTERVAL to 4 (yearly).
Important notes on orders
-
The regify-provider does not generate invoices. There is no such option available. For each order in the shop system, the regify provider appliance is sending you a notification e-mail containing all necessary information.
-
As a regify-provider, you are allowed to use the Provider-SDK to access the database. A developer can use these functions to create reports or establish an individual invoicing process. Please contact regify support for additional help on this. If you want to hire regify for such development, please feel free to contact our sales team.
-
The shop-pages in the regify provider appliance are customizable for [arabic]
-
regimail for the individual users
-
regimail for group administrators
-
-
Currently, there is no shop system for regibox. The administrator manually enables regibox for the dedicated users. The provider-SDK also may get used for this. Optionally, all new users might get regibox activated by default (provider setting).
-
Inside of the shop pages for individual users, cutomers are also able to buy for other persons in addition to themselves. Thus, for example, one person can buy regimail professional membership for himself and multiple additional persons.
-
The monthly reports, generated and sent to regify automatically, are not containing information about individual users. The report contains only statistical information about the number of regify accounts and regimail users and the usage of regipay and regibill. Upon this, there is no option to generate user invoices on this information.
-
The system administrator is able to export all customers transaction counters in XML or CSV format. If you like to use this data for billing only, please deactivate customers bank data pages (remove flag P from sub-provider menu flags) and set INVOICINGINTERVAL to 4 (yearly).
Coupon Codes
Coupon Codes offer you an easy way to optimize marketing. If a coupon code is entered during registration or invitation, the invited user may get extra benefits for regimail professional membership.
Activate Coupon Codes
In order to activate the coupon code feature in your system, you need to enter the provider web administration with “master” role (on the main provider system). Go to Manage sub-providers and select the sub-provider you want to activate coupon codes.
Then, click Manage subprovider menu flags in the Common tab of the settings to edit the individual menu flags of this sub provider.
Now, make sure that option 2 - Display „coupon-code“ questions on registering and invitation dialogs is enabled and confirm using Save settings.
Create new coupon codes
Enter the (or if you want to create coupon codes for a sub provider). Click on Coupon-codes option to enter coupon code dialogue.
In the last line you can create new coupon codes:
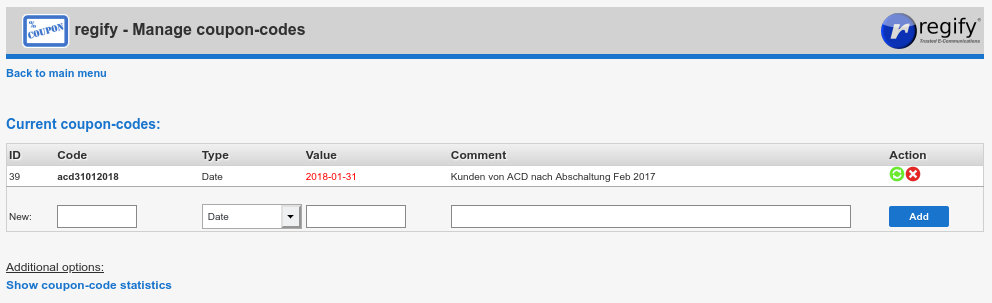
Just enter a new code into the field below the Code column (do not make it to easy to guess). Now choose between one of the two possible types:
Date – Will make the new member regimail professional until this date.
Days – Will make the new member regimail professional for n days upon registration.
Please note that the Date type is more reliable because the coupon code automatically runs out after a while. The Days type is valid until you manually disable the coupon code feature.
Enter either a valid date (type date) or number (days) to the Value field. The comment is useful for you to remember ideas or terms or people names for the code.
Coupon code actions
The list of coupon codes offers you two Action icons at the end of each coupon code entry. The two functions are very different:
deactivate - deactivates the code. It can not longer get used. But you still can see its results in the coupon code statistics page. A deactivated coupon code can get reactivated at any time.
remove - the code is completely removed from the system. There is no further assignment visible for users in the coupon code statistics page. We suggest to use this only if a coupon code was never used!
| There is no security question. Be carefull. |
Notes about coupon codes
Coupon codes can only be used for regimail professional membership. There are no coupon codes affecting regibox other regify products.
During registration, if a coupon code is of type Date and the difference between registration date and coupon code date is less than 30 days, the user will still get 30 days regimail professional. This is because all new users get 30 days free regimail professional by default (ACTIVEAFTERSIGNIN settings variable). So the coupon code is not used and ran out.
Hints for PayPal setup
In order to use a PayPal account for automatic billing, the PayPal IPN feature must be enabled (Instant Payment Notification). In order to activate this feature, please login to your PayPal account.
IPN Payment notification URL
To set the IPN notification URL, please chose . In this dialogue, select My selling tools.
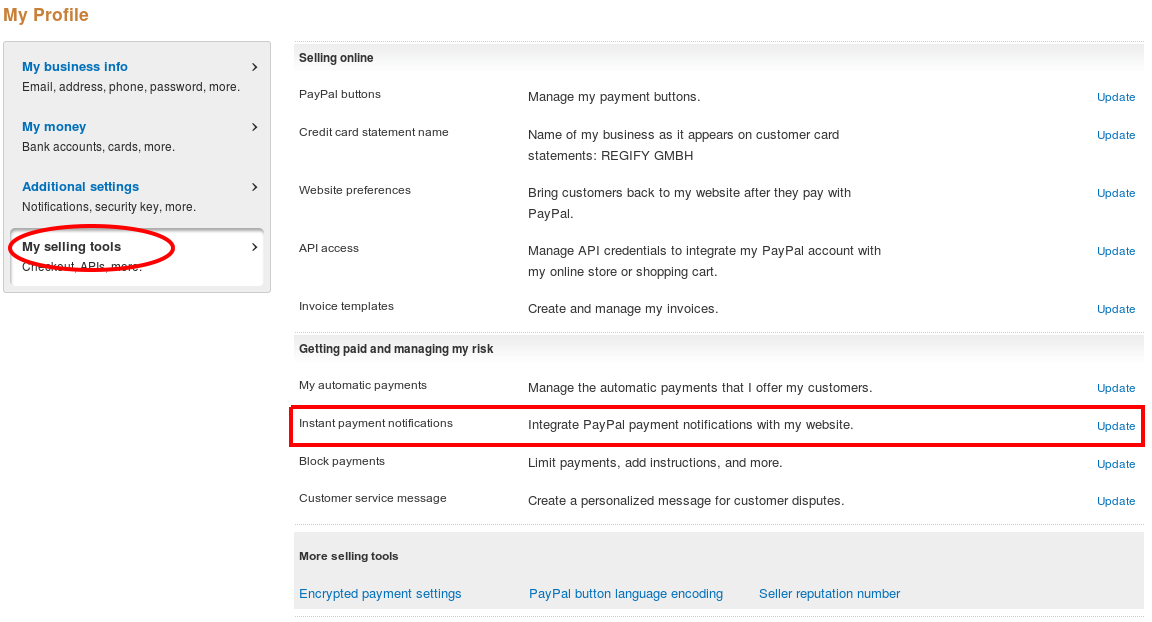
Now click the Update link in the Instant payment notifications line. There you may find some information that IPN (Instant Payment Notification) is not activated. The message contains a Choose IPN Settings button . Please click it.
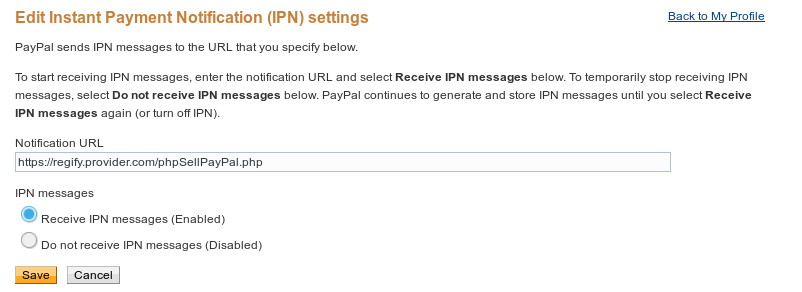
In order to activate IPN now:
-
Please customize and enter the following Notification URL:
https://<yourProviderDomain>/phpSellPayPal.php -
Now check the Receive IPN messages (Enabled) option.
-
Save the settings by clicking the Save button.
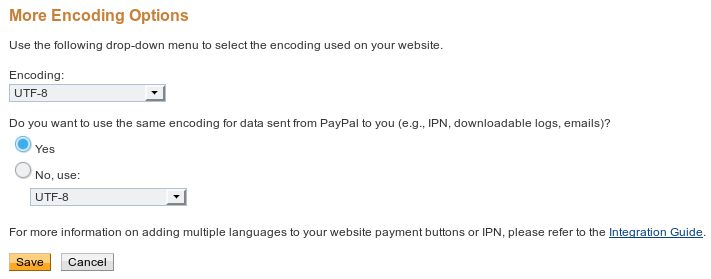
PayPal button character encoding
In addition, you need to make sure that your PayPal account is set to UTF-8 character encoding. For this, please enter again and select My selling tools.
In the bottom area below More selling tools, please select PayPal button language encoding.

There, please click on More Options… button. Now select UTF-8 as encoding:
After you saved the settings, you can activate PayPal payment in your regify provider in the SHOP tab of your sub-provider settings.
Please make sure that the payment process is working by doing some test-orders.